Learning to sketch human hands can feel, well, a little bit like trying to catch smoke, is that how it feels for you sometimes? For many who enjoy putting pencil to paper, these expressive parts of our bodies often present a unique sort of puzzle. They seem to have so many little moving pieces, and getting them to look just right, whether they're holding something, pointing, or simply resting, can be a real head-scratcher. Yet, the truth is, with a few simple ideas and a bit of patience, anyone can get better at sketching them.
You might have felt that familiar pang of frustration, perhaps even a tiny bit of dread, when your drawing gets to the point where you need to add hands. It’s almost as if they have a mind of their own, refusing to sit still or look natural on the page. People often struggle with getting the proportions correct, or making them seem like they belong to the person they are drawing. Honestly, it’s a very common spot to get stuck, so you're certainly not alone in that feeling.
But what if I told you that this seemingly hard task is actually quite approachable once you have some good steps to follow? This friendly guide is here to walk you through the process, offering simple ideas and practical hints to help you feel more sure of yourself when sketching hands. We'll go over how to think about them, from their overall shape to the tiny bits that make them look real, so you can draw them with more ease, you know?
Table of Contents
- Why Do Hands Seem So Tricky to Draw?
- Getting the Big Picture-How to Draw Hands with Basic Shapes
- What About the Bones and Bits-How to Draw Hands with Anatomy in Mind?
- How Do You Get the Sizes Just Right-How to Draw Hands with Good Proportions?
- Bringing Hands to Life-How to Draw Hands from Different Angles and Gestures
- Adding Depth and Feeling-How to Draw Hands with Shading
- Where Can You Find Help-How to Draw Hands with References and Practice?
- What If You're Just Starting Out-How to Draw Hands as a Beginner?
Why Do Hands Seem So Tricky to Draw?
Many folks find sketching hands to be a bit of a challenge, and honestly, that's pretty common. It's almost like they have a mind of their own, with all those fingers and knuckles that bend and move in so many ways. The main reason they feel difficult is because they are incredibly expressive and have a lot of small parts that can look different depending on how they are positioned. You see, a hand isn't just a flat shape; it has depth and volume, and it can change its appearance quite a lot from one moment to the next, which is why it can be rather hard to capture.
Think about it, a hand can be open, closed, pointing, grasping, or simply resting, and each of these actions makes it look quite different. Getting the overall size of the palm right, then making sure the fingers have the correct lengths and thicknesses, can feel like a big puzzle. Plus, there are all those tiny wrinkles and creases that give a hand its unique character. But, really, it isn't too complicated once you know what to do, and have some clear steps to follow. You might even find it becomes one of your favorite things to draw.
The good news is that while hands might seem like a big hurdle at first, they become much more manageable once you learn to break them down into simpler components. It's a bit like learning to build something complex; you start with the main parts before adding the smaller, more detailed bits. This guide will help you see the hand not as one big, scary thing, but as a collection of shapes and lines that, when put together correctly, make something quite beautiful. So, you know, don't worry too much about it.
Getting the Big Picture-How to Draw Hands with Basic Shapes
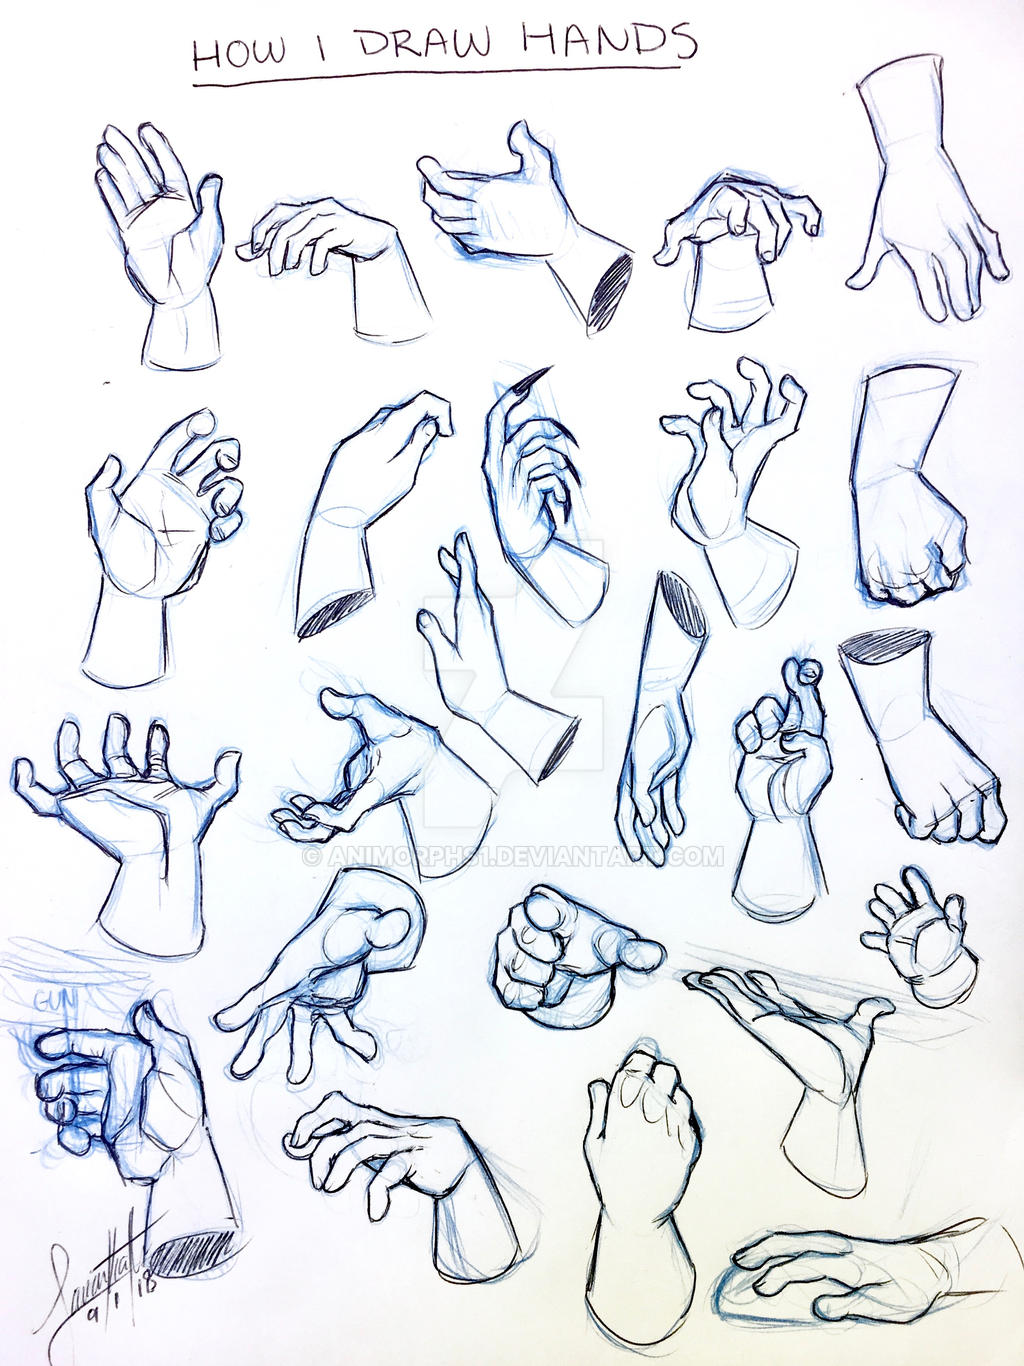
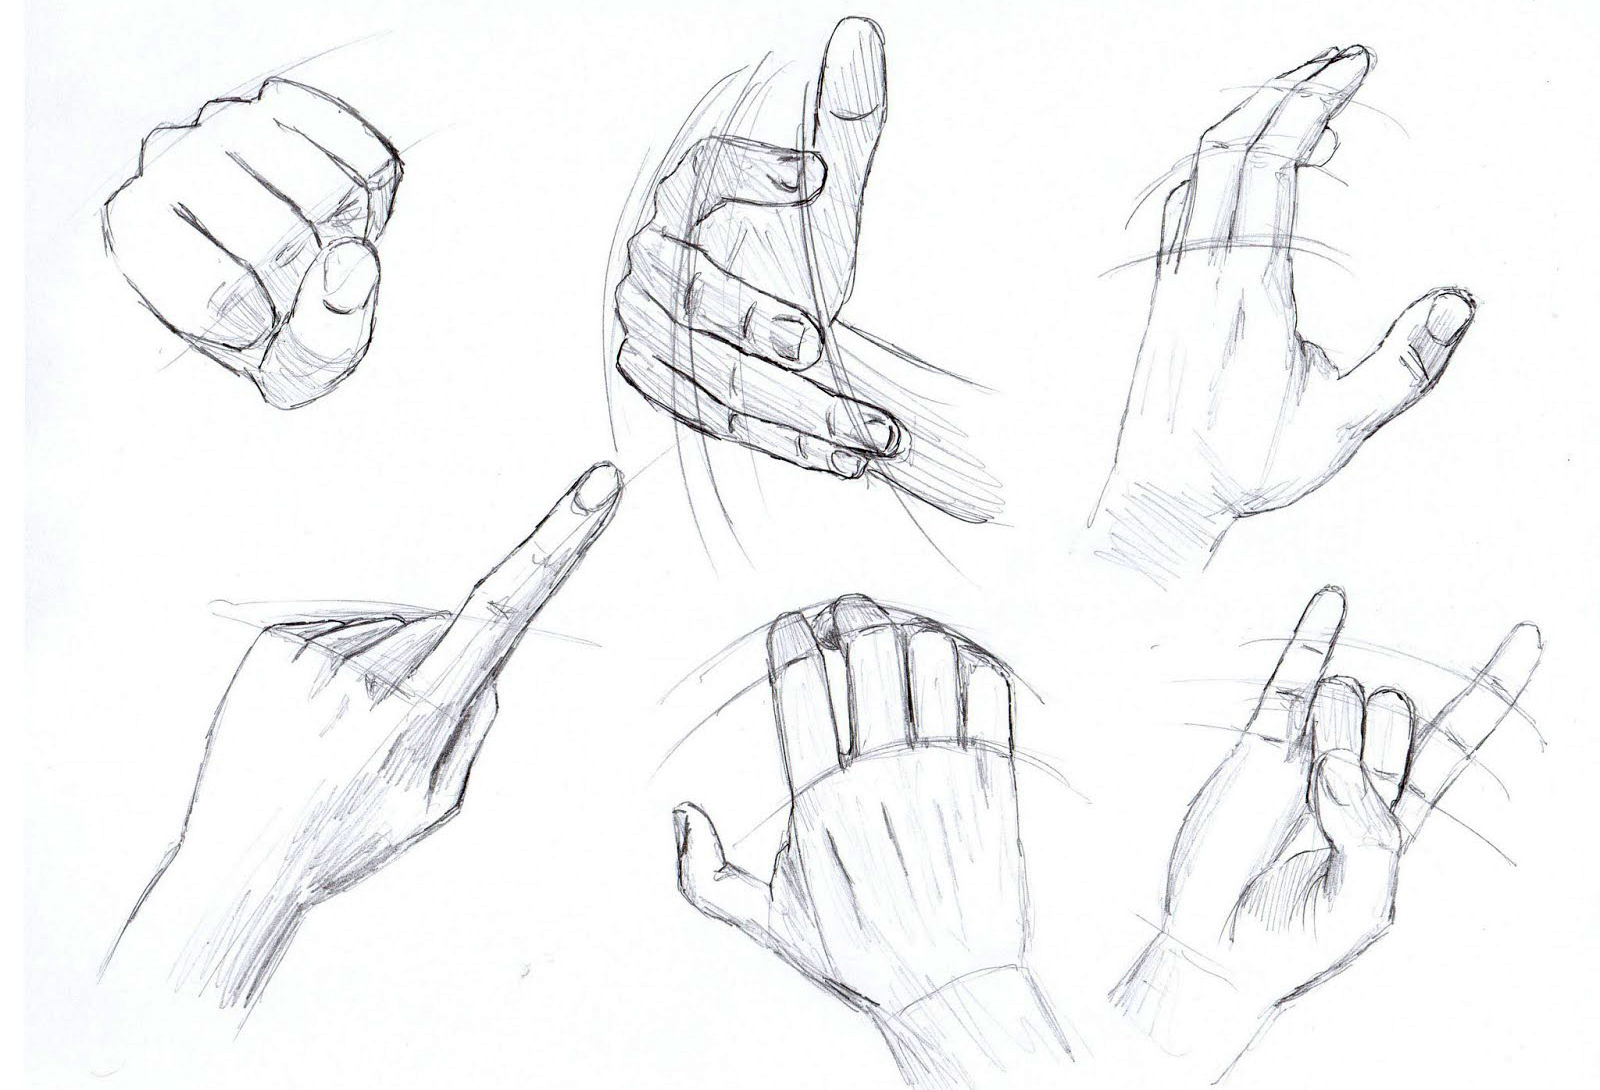
To begin sketching hands, one of the best ideas is to start with really simple shapes. You can think of the palm, for example, as a kind of box or a slightly squashed rectangle. This gives you a solid base to build upon. Then, for the fingers, you can imagine them as a collection of small cylinders or tubes, each bending at its own joint. This way of looking at things helps simplify the whole process, making it much less overwhelming, you know?
A helpful trick many people use is what some call the "mittens method." This involves sketching the hand's overall shape as if it were a mitten, with the thumb separated from the main part of the hand. This simple outline helps you get the general placement and size of the palm and thumb correct before you worry about individual fingers. It's a really quick way to block out the hand's basic form, and it's quite effective for getting started, honestly.
After you have that basic mitten shape down, you can then start to add the individual fingers. Remember those cylinder shapes? You can sketch them lightly coming off the "mitten" part, making sure to pay attention to their lengths relative to each other. The middle finger is usually the longest, and the pinky finger is often quite a bit shorter. By keeping your initial lines very light, you can easily adjust them as you go, which is pretty important for getting things just right. This approach makes learning how to draw hands much more approachable.
What About the Bones and Bits-How to Draw Hands with Anatomy in Mind?
While you don't need to be a doctor to sketch hands well, having a general idea of how the bones and muscles work can really make your drawings look more convincing. Think of the hand as having a sort of internal framework, like a tiny building. The main bones in the palm are called metacarpals, and then you have the phalanges, which are the bones that make up your fingers. Knowing where these bones are helps you understand why a hand bends a certain way, or why certain parts stick out a little, you know?
For example, the knuckles are where the bones meet, and understanding their placement helps you draw those bumps and folds that give a hand its real look. The thumb, too, has its own special set of bones and muscles that allow it to move in a very wide range, which is why it's so useful. When you're sketching, you don't need to draw every single bone, but just having that mental picture of the underlying structure helps you make the outer shape feel more solid and believable, which is pretty cool.
Muscles also play a big part in how a hand looks and moves. There are muscles in the palm, especially around the base of the thumb and pinky finger, that create those fleshy pads you can feel. These muscle groups change shape as the hand moves, and recognizing this helps you add volume and natural curves to your drawings. So, in a way, learning a little about how the hand is put together on the inside can really help you with how to draw hands that look alive on the outside, you see?
How Do You Get the Sizes Just Right-How to Draw Hands with Good Proportions?
One of the biggest keys to making a hand look realistic is getting the sizes of its different parts correct, which people often call proportions. It's about how long one finger is compared to another, or how big the palm is next to the whole hand. If these relationships are off, the hand can look a little strange, perhaps too long or too stubby. A simple way to think about it is that the length of the middle finger is often about the same as the length of the palm itself, not including the wrist. This little trick can give you a really good starting point for how to draw hands that seem correctly sized.
When you are trying to get the sizes right, you can even use your own hand as a reference. Hold it up and really look at it. Notice how the index finger and ring finger are often quite similar in length, while the pinky finger is usually much shorter. The thumb, too, has its own unique size and position; its base is often quite low on the palm, making it seem almost separate from the other fingers. Paying attention to these small details can make a big difference in how convincing your drawing appears, you know?
Another helpful idea is to think about the overall shape the fingers make when they are together. They don't just stick out straight; they tend to form a gentle curve, with the middle finger at the highest point. Even when spread out, there's a certain harmony to their lengths and the spaces between them. By taking a moment to measure or just carefully observe these relationships, you'll be well on your way to drawing hands that have the right balance and feel natural. It’s pretty important to get these measurements down, you see.
Bringing Hands to Life-How to Draw Hands from Different Angles and Gestures
Once you have a handle on the basic shapes and sizes, the next exciting step is to think about how hands look from different viewpoints and what they might be doing. A hand seen from the side will look very different from one seen from the front or from above. This idea, often called perspective, can make a hand seem like it's coming towards you or moving away. It's a bit like looking at a box; it changes shape depending on where you stand. So, when learning how to draw hands, try sketching them from all sorts of positions, which is really quite fun.
Hands are also amazing at showing what someone is feeling or doing. A clenched fist shows anger, while an open palm might suggest peace or an invitation. These actions, or gestures, add so much to a drawing. Thinking about the story the hand is telling can guide your pencil. Does it look relaxed? Is it reaching for something? Each gesture will change the way the fingers bend and the palm wrinkles, so you'll want to pay close attention to those small changes, you know?
Practicing hands in various positions, like holding an object, waving, or even just resting, will help you understand their flexibility. You can try sketching your own hand in a mirror, or take photos of it in different poses. Even sketching hands of different ages, like a child's small, plump hand versus an older person's hand with more visible veins and wrinkles, can teach you a lot about how to capture variety. It's really about observing how the simple shapes you learned earlier change and stretch with each new angle and action, which is quite interesting.
Adding Depth and Feeling-How to Draw Hands with Shading
After you have the outline and basic shapes of your hand drawing, adding shading is what truly brings it to life, making it look three-dimensional instead of flat. Shading is all about showing how light hits the hand and where shadows fall. Think about where your light source is coming from – is it above, to the side, or from the front? The parts of the hand facing the light will be brighter, while the parts turned away will be darker, you know?
To create a sense of roundness and form, you'll want to use different pressures with your pencil. For instance, a light touch can create soft, subtle shadows, while pressing harder will make darker, more intense areas. The knuckles, the fleshy parts of the palm, and the curves of the fingers all have their own unique ways of catching light and casting shadows. By carefully building up layers of tone, you can make your hand drawing appear to pop right off the page, which is pretty neat.
Don't forget about reflected light, too. Sometimes, light bounces off a surface near the hand and subtly illuminates a shadow area, making it not completely dark. This small detail can add a lot of realism. Shading is a process of observation and gradual building, so take your time. Looking at real hands under different lighting conditions can give you great ideas for how to apply your pencil to show depth and texture. It's a key step in learning how to draw hands that truly feel real.
Where Can You Find Help-How to Draw Hands with References and Practice?
One of the very best ways to get better at sketching hands is to use references. This simply means looking at real hands, or pictures of hands, as you draw. Your own hand is a fantastic model, always available! You can hold it in different positions, turn it around, and really study how the light falls on it, how the fingers bend, and what shapes the palm makes. This direct observation is incredibly helpful for building your visual memory and understanding how things really look, you know?
Beyond your own hand, there are many places to find reference photos. Websites, books, and even just taking pictures with your phone can provide a wealth of material. Look for photos that show hands from various angles, with different gestures, and even hands of different ages or sizes. The more variety you observe, the better equipped you'll be to draw any hand you can imagine. It’s pretty important to gather a good collection of these.
And then, of course, there's practice. Drawing hands over and over again, even quick sketches, will help solidify what you've learned. Some people find workbooks with guided exercises very useful, as they break down the process into manageable steps. Others prefer following video tutorials that show the process in real-time. The main idea is to keep sketching, keep observing, and keep trying new things. Every sketch, whether it feels good or not, helps you learn how to draw hands a little better for next time.
What If You're Just Starting Out-How to Draw Hands as a Beginner?
If you're just beginning your adventure in drawing, and the idea of sketching hands seems like a really big mountain to climb, please know that everyone starts somewhere. It's completely normal to feel a bit unsure at first. The most important thing is to be kind to yourself and understand that learning any new skill takes time and consistent effort. You won't be drawing perfect hands overnight, and that's perfectly okay, you know?
For beginners, it's a good idea to focus on the very basic steps first. Start with those simple shapes – the mitten for the hand, and the cylinders for the fingers. Don't worry too much about all the tiny details or making it look perfectly real in your first few tries. The goal is to get comfortable with the general form and how the main parts fit together. Think of it as learning the alphabet before you write a story; each small step builds on the last, which is quite reassuring.
There are many resources made especially for those just starting out. You can find easy, beginner-friendly tutorials that walk you through the process step by step, sometimes even in less than ten minutes for a basic outline. These resources often break down hand anatomy into very simple ideas and suggest easy construction methods. The key is to keep practicing, to look at hands often, and to remember that every artist, no matter how good they are now, was once a beginner too. So, just keep at it, and you'll get there, pretty much.
This guide has walked you through the process of learning how to draw hands, starting with simple shapes and moving to more detailed aspects. We looked at why hands can seem tricky but are quite manageable with the right approach. We explored how basic forms help get the big picture, and how a general understanding of anatomy makes drawings more convincing. We also covered the importance of getting proportions right, how to show hands from different angles and with various gestures, and the role of shading in adding depth. Finally, we discussed the value of using references and practicing often, offering encouragement for anyone just beginning this creative journey.
Related Resources:

Detail Author:
- Name : Kelvin Terry
- Username : elroy.flatley
- Email : huel.owen@stracke.com
- Birthdate : 1999-11-13
- Address : 383 Wuckert Fork Suite 578 East Ericland, VA 75210-3242
- Phone : +14457152795
- Company : Ziemann-Padberg
- Job : Residential Advisor
- Bio : Autem unde id aliquam et. Ex nihil ullam et aut dolor qui. Quae non consequatur labore sit.
Socials
facebook:
- url : https://facebook.com/norwood.stracke
- username : norwood.stracke
- bio : Illum unde dolor molestiae ex maxime illo rerum.
- followers : 5069
- following : 1202
tiktok:
- url : https://tiktok.com/@norwood8345
- username : norwood8345
- bio : Nulla reiciendis veniam illo repudiandae magni eius. Non rerum et sed vitae.
- followers : 5132
- following : 71
